


Introduction
Since many people have computers, the internet is available almost everywhere programming is done by almost everyone and we have every kind of programming code :-D
Something important for professionals and even if you’re not (It is better to have best practices soon ;-) ) is a clean code. For that you have many concepts, and philosophies: OOP, SOLID, DRY, use the right design patterns, etc. Here we’ll use a tool that helps to analyze your code: Sonarqube
SonarQube is an open-source platform developed by SonarSource for continuous inspection of code quality to perform automatic reviews with static analysis of code to detect bugs, code smells, and security vulnerabilities in 20+ programming languages (PHP, Java, Python, etc …).
There are different types of editions available :
Community (what we’ll use here)
Developer
Enterprise
Data Center
Prerequisite
To follow and run this tutorial, you should have this install :
docker (link)
install sonarqube
Symfony application
browser (to check the result after sonarqube analysis)
Utility
Sonarqube is used to analyze code quality, especially :
Reliability
Security
Maintainability
Coverage
Duplications
Size
Complexity
Issues
Using Sonarqube
In this tutorial, we’ll use Sonarqube Community Edition but we won’t download it on the website, we’ll use his docker’s image.
To run the command lines below, you should have docker installed.
Open the terminal
Run commands below on that terminal (maybe on Linux you should run all that commands as a sudoer)
Open your browser
Launch: http://localhost:9000
Symfony app code analysis
To analyze your Symfony application, you should :
Create a project on Sonarqube
configure your application to be analyzed by Sonarqube
Launch the analysis on your Sonarqube container
- Create a Sonarqube project
Launch http://localhost:9000 in the browser
Below are some snapshots of steps to follow when you create a project :
In the final step, you have the command line to launch your analysis, but since our Sonarqube is running in a docker’s container our command will be a little bit different :)
- Add a Sonarqube config file in the root directory of your project (sonar-project.properties):
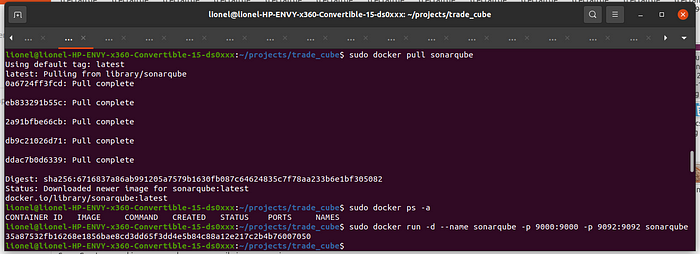
- Launch the command in the terminal
Command-line structure :
docker run -ti -v [project_absolute_path]:[project_absolute_path_inside_container] — link sonarqube newtmitch/sonar-scanner -Dsonar.projectKey=[projectKey] -Dsonar.sources=[directories_containning_sources_code] -Dsonar.login=[login_provided_in_the_final_step] -Dsonar.projectBaseDir=[project_absolute_path_inside_container]
Example (using configurations below) :
docker run -ti -v /home/lionel/projects/trade_cube/:/root/trade_cube — link sonarqube newtmitch/sonar-scanner -Dsonar.projectKey=MediumProjectKey -Dsonar.sources=src -Dsonar.login=ab58b9bc33ba27cdf69ddb359795baffa1657d0a -Dsonar.projectBaseDir=/root/trade_cube
Result:
- Command-line
- Sonarqube report
Conclusion
It is important to always analyze your code, because :
Your application will be more robust
Your application will be maintainable
You’ll use to follow that best practice
It will give you good reflexes when writing your code later
But notice that it will never give you a complete analysis, sometimes only a developer helps you.
I hope this little tutorial helped you, of course, it is not complete and I’m open to comments and ideas on how to make it better, thanks ;).
Sources;